Blog

  • The Spookiest Bloody Mary You’ll Ever Make

    The Spookiest Bloody Mary You’ll Ever Make

    Halloween is the perfect time to embrace the eerie and unexpected in your drink choices. The Bloody Mary, with its bold tomato base and spicy kick, becomes even more thrilling when infused with a sinister twist that echoes the holiday’s spooky vibe. Imagine garnishing it with a floating olive eyeball or a celery stalk like a green witch’s broom.

    This recipe isn’t just about the flavor; it’s about creating an experience. The swirling red and dark garnishes conjure a mystical potion, perfect for parties that want a little chaos and charm. It’s a cocktail that sparks conversations and leaves a lasting shiver of delight.

    Spooky Halloween Bloody Mary

    This Bloody Mary is a classic cocktail made with vodka, tomato juice, and savory seasonings, served over ice. Its vibrant red color and garnishes resembling eerie eyes and green brooms create a visually striking, drinkable Halloween-themed experience.
    Prep Time 10 minutes
    Total Time 10 minutes
    Servings: 1
    Course: Main Course
    Cuisine: American
    Calories: 220

    Ingredients
      

    • 4 oz vodka preferably chilled
    • 4 oz tomato juice
    • 1 dash Worcestershire sauce
    • 1 dash hot sauce
    • Pinch celery salt
    • Ice as needed for filling
    • Candy eyeballs or stuffed olives for garnish to resemble floating eyes
    • Celery stalks for garnish shaped like green brooms

    Equipment

    • Cocktail shaker
    • Tall glass
    • Bar spoon
    • Candy eyeballs or stuffed olives
    • Celery stalk

    Method
     

    1. Begin by pouring the vodka and tomato juice into a cocktail shaker filled with ice.
    2. Add Worcestershire sauce, hot sauce, a pinch of celery salt, and a few twists of black pepper into the shaker.
    3. Secure the lid and shake vigorously for about 10-15 seconds until the mixture is well chilled and slightly frothy.
    4. Strain the mixture into a tall glass filled with fresh ice, allowing the bright red liquid to settle and look vibrant.
    5. Garnish the drink with candy eyeballs or stuffed olives floating on top to resemble spooky eyes, and insert a celery stalk shaped like a broom for a playful, Halloween touch.
    6. Serve immediately and enjoy the visually striking, spooky cocktail with its bold flavors and eerie presentation.
    As the night winds down, these Bloody Marys will leave behind a trail of satisfied smiles and stories told in hushed tones. The bold, spicy aroma mingling with the crisp evening air makes this drink a memorable part of your Halloween gathering.

    Enjoy crafting this special twist for your spooky celebration. Whether you serve it to thrill your guests or simply indulge in a little culinary mischief, it’s a drink that celebrates the fun and fright of the season.

  • Spiced Pumpkin Muffins: A Cozy Fall Twist

    Spiced Pumpkin Muffins: A Cozy Fall Twist

    As the leaves turn amber and the air grows crisp, I find myself craving more than just a scoop of pumpkin-spiced latte. These pumpkin muffins bring a comforting scent of cinnamon and nutmeg that instantly transports me to autumn mornings. The best part? They’re surprisingly simple to whip up with a handful of pantry staples.

    This recipe isn’t just about pumpkin; it’s about layering flavors and textures. Each bite delivers a moist crumb with a hint of sweetness, complemented by crunchy streusel topping. These muffins are perfect for brunch or a mid-morning treat while watching the seasonal change outside.

    Pumpkin Muffins with Streusel Topping

    These pumpkin muffins are moist and tender with a hint of cinnamon and nutmeg, featuring a crunchy streusel topping for added texture. They are made by mixing wet and dry ingredients, assembling with a crumble topping, and baking until golden brown for a fluffy, visually appealing final product.
    Prep Time 15 minutes
    Cook Time 20 minutes
    Total Time 35 minutes
    Servings: 12
    Course: Main Course
    Cuisine: American
    Calories: 220

    Ingredients
      

    • 1 ½ cups all-purpose flour
    • 1 cup granulated sugar
    • 1 cup canned pumpkin unsweetened
    • ½ cup vegetable oil
    • 3 large eggs
    • 1 ½ teaspoons baking powder
    • 1 teaspoon ground cinnamon
    • ½ teaspoon ground nutmeg
    • ¼ teaspoon salt
    • ½ cup brown sugar for streusel topping
    • cup all-purpose flour for topping
    • ¼ cup granulated sugar for topping
    • ¼ cup unsalted butter cold

    Equipment

    • Mixing bowls
    • Whisk
    • Muffin tin
    • Measuring cups and spoons
    • Small bowl for streusel
    • Pastry cutter or fork

    Method
     

    1. Preheat your oven to 375°F (190°C) and line a muffin tin with paper liners.
    2. In a large mixing bowl, whisk together the flour, sugar, baking powder, cinnamon, nutmeg, and salt until well combined.
    3. In a separate bowl, beat the eggs, then stir in the pumpkin and vegetable oil until smooth.
    4. Pour the wet mixture into the dry ingredients and fold gently until just combined, avoiding overmixing to keep the muffins tender.
    5. Spoon the batter into the prepared muffin tin, filling each cup about ¾ full.
    6. To make the streusel topping, combine brown sugar, flour, and granulated sugar in a small bowl. Dice the cold butter and cut it into the dry mixture using a pastry cutter or fork until crumbly.
    7. Sprinkle the streusel evenly over the muffin batter.
    8. Bake the muffins in the preheated oven for 20-25 minutes, or until a toothpick inserted into the center comes out clean and the tops are golden brown.
    9. Remove the muffins from the oven and let them cool for a few minutes before transferring to a wire rack to cool completely. The streusel will be crisp and the muffins moist and fluffy inside.
    Baking these pumpkin muffins adds a warm touch to any fall day. The aroma alone makes the whole house feel cozy and inviting. Once they’re out of the oven, the bits of toasted streusel echo the crisp fall air around us.

    The joy of baking something so versatile and flavorful reminds me how comforting simple ingredients can become. They’re excellent with a splash of cold milk or a dollop of whipped cream. In a season full of change, these muffins offer a small, satisfying moment of warmth and nostalgia.

  • Hidden Pumpkin Magic: The Ultimate Healthy Pancakes

    Hidden Pumpkin Magic: The Ultimate Healthy Pancakes

    Every fall, I find myself craving comfort food that feels indulgent but actually nourishes my body. This recipe for healthy pumpkin pancakes flips the script on traditional indulgent breakfasts. It’s my secret weapon on chilly mornings when I want cozy, sweet, and hearty all in one bite.

    The key is in the subtle pumpkin flavor that blends seamlessly into fluffy, protein-packed pancakes. The aroma of cinnamon and nutmeg swirls through the air as they cook, awakening the senses and making mornings special. And the best part? These pancakes are quick to whip up, perfect for busy weekends or lazy holidays.

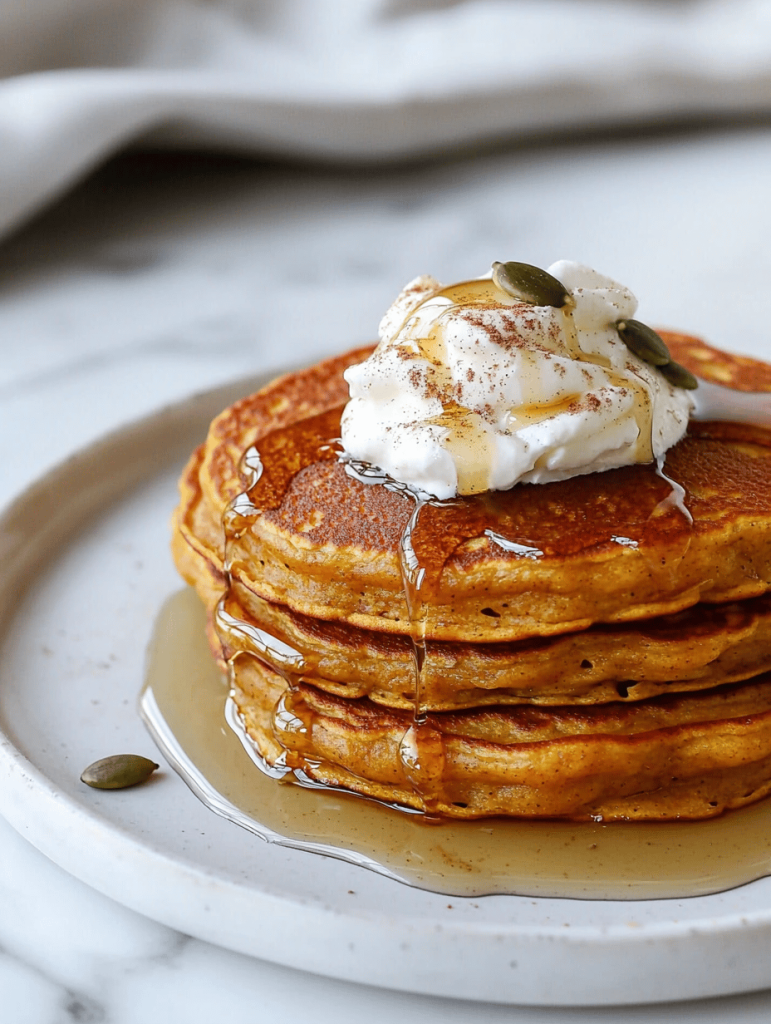
    Healthy Pumpkin Pancakes

    These pumpkin pancakes are fluffy, protein-packed breakfast treats infused with subtle pumpkin flavor and warm spices. They are cooked on a griddle until golden brown, resulting in tender, hearty pancakes with a slightly crisp exterior and soft interior. The aroma of cinnamon and nutmeg enhances their cozy appeal, making them perfect for a fall morning meal.
    Prep Time 10 minutes
    Cook Time 15 minutes
    Total Time 25 minutes
    Servings: 4
    Course: Main Course
    Cuisine: American
    Calories: 250

    Ingredients
      

    • 1 1/2 cups all-purpose flour sifted
    • 2 tablespoons brown sugar packed
    • 1 teaspoon baking powder
    • 1/2 teaspoon baking soda
    • 1/2 teaspoon ground cinnamon preferably ground cinnamon
    • 1/4 teaspoon ground nutmeg freshly grated if possible
    • 1/4 teaspoon salt
    • 1 cup milk dairy or plant-based
    • 1/2 cup canned pumpkin pure pumpkin puree
    • 2 large egg
    • 2 tablespoons unsalted butter melted

    Equipment

    • Mixing bowl
    • Whisk
    • Non-stick Skillet or Griddle
    • Spatula

    Method
     

    1. In a large mixing bowl, sift together the flour, brown sugar, baking powder, baking soda, cinnamon, nutmeg, and salt to combine the dry ingredients evenly.
    2. In a separate bowl, whisk the milk, pumpkin puree, eggs, and melted butter until smooth and well combined.
    3. Pour the wet mixture into the dry ingredients and gently fold them together using a spatula, just until no streaks remain. Be careful not to overmix—the batter should be slightly lumpy and thickening.
    4. Preheat a non-stick skillet or griddle over medium heat until hot but not smoking, approximately 350°F (175°C). Lightly grease with butter or oil if necessary.
    5. Pour about 1/4 cup of batter for each pancake onto the skillet, spacing them apart to allow room for spreading. Cook until bubbles form on the surface and the edges look set, about 2–3 minutes.
    6. Flip the pancakes carefully with a spatula and cook for another 2–3 minutes, until golden brown on both sides and cooked through in the center.
    7. Transfer the cooked pancakes to a plate and repeat the process with the remaining batter, adjusting the heat as needed to prevent burning.
    8. Serve the pumpkin pancakes warm, topped with your favorite toppings like syrup, whipped cream, or extra cinnamon for a cozy breakfast experience.

    What I love most is how versatile these pumpkin pancakes are—they can be topped with anything from Greek yogurt to toasted pecans. They remind me of autumn mornings at my grandparents’ farm, where every breakfast felt like a celebration of harvest.

    This recipe is a gentle reminder that health and comfort can coexist. It’s a little hug on a plate, perfect for the season’s transition and those cozy weekends ahead. No matter how hectic life gets, these pancakes always bring a moment of calm and joy.

  • Chill Out with a Nostalgic Vanilla Slushie Twist

    Chill Out with a Nostalgic Vanilla Slushie Twist

    When the heat hits hard and the blender calls out for a new project, I turn to an unlikely hero: the vanilla slushie. It’s more than just a cold beverage; it’s a portal to childhood summers, but with an upgrade that surprises the palate. The simplicity of vanilla combined with the icy crunch creates a sensory experience that feels both familiar and unexpectedly sophisticated.

    This recipe isn’t just about cooling down; it’s about embracing a moment of joy amidst chaos. Whether you’re craving a quick refresh after a long day or looking for that extra touch of nostalgia at your next gathering, this vanilla slushie is your new best friend.

    Vanilla Slushie

    The vanilla slushie is a frozen beverage made by blending vanilla-flavored ingredients with ice until smooth and icy. It has a creamy, granular texture with a visually appealing pale hue, offering a refreshing and nostalgic treat. The process involves blending and pouring for an instantly enjoyable cold dessert or drink.
    Prep Time 5 minutes
    Total Time 5 minutes
    Servings: 2
    Course: Main Course
    Cuisine: Universal
    Calories: 180

    Ingredients
      

    • 2 cups vanilla ice cream or vanilla-flavored frozen yogurt for creaminess and flavor
    • 1 cup ice cubes to achieve icy texture
    • 1/2 cup milk for smooth blending
    • 1 tsp vanilla extract enhances vanilla flavor

    Equipment

    • Blender
    • Measuring cups and spoons

    Method
     

    1. Add vanilla ice cream, ice cubes, milk, and vanilla extract into the blender jar.
    2. Secure the lid and blend on high speed for about 30-60 seconds until the mixture is smooth, thick, and icy in texture.
    3. Stop the blender and check the consistency—if it’s too thick, add a splash more milk and blend briefly again.
    4. Pour the blended vanilla slushie into chilled glasses, using a spoon or ladle.
    5. Optionally, garnish with a scoop of vanilla ice cream or a sprinkle of vanilla bean for presentation.
    6. Serve immediately with a straw or spoon and enjoy the refreshing, icy texture.

    Notes

    For an extra flavor twist, add a splash of flavored liqueur or a dash of cinnamon before blending.
    Making a vanilla slushie might seem straightforward, but it’s the little tweaks — like a splash of vanilla bean or a drizzle of honey — that turn it into something memorable. Keep experimenting with textures and ingredients; each batch can be a little different, a little special.

    Enjoy this simple yet satisfying treat as the seasons change or whenever you need a quick escape. Sometimes, the simplest pleasures are the sweetest, and this icy vanilla delight is no exception. It’s a reminder that comfort can come in the coolest form possible.

  • Spooktacularly Creepy Halloween Mummy Meatballs

    Spooktacularly Creepy Halloween Mummy Meatballs

    Halloween is my favorite time to embrace chaos and fun in the kitchen. This year, I wanted to create something that’s both spooky and nostalgic—enter the Mummy Meatballs, with an extra creepy twist. The smell of savory beef, mingled with the zing of herbs, fills my kitchen every time I make these—perfect for a holiday gathering filled with kids’ giggles and grown-up chuckles.

    What makes these meatballs special isn’t just their haunted appearance but the story behind them. I remember helping my grandma roll meatballs as a kid, the flour dust on our hands, and the warm, comforting aroma wafting through the house. This recipe makes that sense of tradition and the thrill of Halloween collide, creating a dish that’s as fun to make as it is to eat.

    Halloween Mummy Meatballs

    These Mummy Meatballs are savory beef meatballs wrapped in strips of puff pastry or crescent dough, baked until golden. Their appearance resembles tiny mummies with twisting bandages, and they have a tender, juicy interior with a crispy exterior, perfect for festive gatherings.
    Prep Time 20 minutes
    Cook Time 25 minutes
    Total Time 45 minutes
    Servings: 8
    Course: Main Course
    Cuisine: American
    Calories: 250

    Ingredients
      

    • 1 ½ pounds ground beef preferably 80/20 for juiciness
    • 1/2 cup breadcrumbs
    • 1 large egg
    • 2 cloves garlic minced
    • 2 tablespoons fresh parsley chopped
    • 1/2 teaspoon salt
    • 1/4 teaspoon black pepper
    • 1 sheet puff pastry or crescent dough dough sheets thawed if frozen
    • 1 egg beaten egg for brushing
    • optional black olives or peppercorns for eyes

    Equipment

    • Baking sheet
    • Oven
    • Mixing bowl
    • Fork
    • Baking parchment
    • Knife

    Method
     

    1. Preheat your oven to 375°F (190°C) and line a baking sheet with parchment paper.
    2. In a mixing bowl, combine the ground beef, breadcrumbs, egg, minced garlic, chopped parsley, salt, and black pepper. Mix everything together using a fork until well incorporated and the mixture is slightly sticky.
    3. Shape the meat mixture into small, roughly 1-inch diameter meatballs, placing them on the prepared baking sheet spaced evenly apart.
    4. Wrap each meatball with strips of puff pastry or crescent dough, crisscrossing the strips to resemble mummy bandages. Leave small gaps for the ‘eyes’ if desired.
    5. Brush each wrapped meatball lightly with the beaten egg to promote a golden crust during baking.
    6. Bake in the preheated oven for 20 to 25 minutes, or until the pastry is puffed and golden brown, and the meat is cooked through.
    7. Once baked, remove the mummy meatballs from the oven and let them cool slightly. For eyes, place small pieces of black olive or a peppercorn on the front of each mummy’s face.
      1 ½ pounds ground beef
    8. Arrange the mummy meatballs on a serving platter for a fun, spooky presentation. Serve warm or at room temperature.

    Notes

    For extra creepiness, you can add tiny strips of red pepper or sauce for ‘blood’ effects. Make sure to watch the baking time carefully so the pastry doesn’t burn.

    There’s something delightful about turning a simple meatball into a spooky mummy—perfect for celebrating the season. These little monsters are a hit with both kids and adults, sparking giggles and appreciation alike. Plus, they’re quick to whip up, so no one has to wait long for the fun to begin.

    As the days get shorter and the air chills, a plate of these creepy creations can bring a burst of festive cheer. Their crispy wrapping and juicy center are a reminder that sometimes, a little chaos in the kitchen makes the best memories. Happy haunting, and enjoy the spooky bites that make Halloween culinary magic.

  • Chill Out with an Unusual Chocolate Slushie Twist

    Chill Out with an Unusual Chocolate Slushie Twist

    Imagine a summer day when a regular icy treat just won’t do. Instead, you reach for something unexpectedly decadent — a chocolate slushie with a surprise ingredient that sparks curiosity and craving. This recipe transforms a simple frozen drink into a nostalgic yet sophisticated dessert that’s perfect for those hot afternoons.

    The secret? A hint of sea salt and a dash of vanilla in the mix. It’s the kind of combo that suddenly makes your favorite childhood chocolate ice cream even more irresistible. Not only does it cool you down, but it also offers a complex flavor profile that keeps every sip interesting.

    Chocolate Sea Salt Slushie

    This chocolate slushie combines frozen cocoa with milk and flavorings, creating a thick, icy beverage with a smooth, scoopable texture. The addition of sea salt and vanilla enhances the chocolate flavor, resulting in a rich and slightly savory final appearance reminiscent of a frozen dessert.
    Prep Time 10 minutes
    Total Time 10 minutes
    Servings: 2
    Course: Main Course
    Cuisine: American
    Calories: 180

    Ingredients
      

    • 1 cup unsweetened cocoa powder preferably unsweetened
    • 2 cups milk dairy or plant-based
    • 2 tablespoons sugar adjust to taste
    • 1/2 teaspoon sea salt
    • 1 teaspoon vanilla extract
    • Ice as needed ice cubes enough to freeze and thicken the mixture

    Equipment

    • Blender
    • Measuring cups and spoons

    Method
     

    1. Combine the cocoa powder, sugar, sea salt, vanilla extract, and milk in a blender. Blend on low until the cocoa and sugar dissolve completely, creating a smooth, chocolatey base.
    2. Add a generous handful of ice cubes to the blender. Continue blending on high until the mixture becomes thick, frosty, and scoopable, with a texture similar to a soft-serve ice cream.
    3. Stop blending and check the consistency. If it’s too runny, add more ice and blend again until the desired icy texture is achieved.
    4. Pour the chocolate slushie into glasses, ensuring it’s thick and visually appealing with a frosty surface.
    5. Optional: Garnish with a sprinkle of sea salt or a drizzle of chocolate syrup for extra flavor and presentation.
    6. Serve immediately with straws or spoons, enjoying the rich, icy treat on a hot day.
    This chocolate slushie isn’t just another frozen drink. It’s a reminder that sometimes, the simplest ingredients can become extraordinary with a little twist. Whether you’re entertaining friends or just treating yourself after a long day, it’s a fun, fuss-free way to indulge.

    Enjoy the creamy richness contrasted with the icy crunch—an experience that’s just as satisfying as it looks. As the weather heats up, this recipe is calling to be made again and again, offering that perfect cold escape with every spoonful.

  • Fizz Your Day: The Art of Crafting a Perfect Coke Slushie

    Fizz Your Day: The Art of Crafting a Perfect Coke Slushie

    Imagine uncovering a vintage soda fountain secret right in your own kitchen. The clink of ice, the fizzing sound of Coke meeting crushed ice, and that rush of familiar caramel aroma—it’s nostalgic with a twist. This fizzy frozen treat is more than just a quick chill; it’s a leap into childhood joy and summer chaos in every sip.

    But what makes a Coke slushie stand out among countless cold drinks? It’s the perfect storm of textures and flavors—the crisp sparkle of carbonation, the silky coolness of the ice, and that deep, sweet cola essence. This recipe transforms simple ingredients into a delight that’s tailored for spontaneous celebrations or lazy afternoons.

    Coke Slushie

    A Coke slushie is a frozen beverage made by blending carbonated cola with crushed ice to produce a refreshing, icy treat. The mixture results in a semi-frozen, bubbly drink with a silky texture and vibrant caramel flavor, resembling a homemade frozen soda dessert.
    Prep Time 5 minutes
    Total Time 5 minutes
    Servings: 2
    Course: Main Course
    Cuisine: American
    Calories: 150

    Ingredients
      

    • 2 cups cola soda chilled
    • 3 cups crushed ice

    Equipment

    • Blender
    • Measuring cups and spoons

    Method
     

    1. Pour the chilled cola soda into the blender.
    2. Add the crushed ice to the blender with the cola.
    3. Secure the lid on the blender and blend on high speed until the mixture is smooth and slushy, about 30-45 seconds, listening for a consistent fizz and a fine icy texture.
    4. Stop the blender and check the texture; it should be icy and semi-frozen with some bubbly fizz remaining.
    5. Pour the slushie into chilled glasses, allowing the icy mixture to settle slightly for a frosty, bubbly appearance.
    6. Serve immediately with a straw or spoon, enjoying the cold, fizzy texture and caramel aroma.
    As the summer heat lingers, there’s something inherently satisfying about turning everyday beverages into moments of festive refreshment. This Coke slushie isn’t just a drink; it’s a way to carve out tiny, joyful escapes.

    Plus, it’s incredibly easy to whip up, whether for a quick treat or a crowd-pleaser at your next gathering. Keep experimenting with different add-ins like a splash of lime or a sprinkle of salt—each twist elevates your icy creation. Remember, sometimes the simplest pleasures make the biggest smiles.

  • Frost-Kissed Fall Casserole: A Cozy Twist You'll Crave

    Frost-Kissed Fall Casserole: A Cozy Twist You'll Crave

    As the leaves turn and a brisk breeze sweeps through, I find myself craving dishes that bring warmth and a touch of nostalgia. This season, I've been obsessed with casseroles that celebrate fall flavors but with an unusual twist. It's not just about comfort; it's about surprising your taste buds while embracing the cozy chaos of autumn.

    Imagine a bubbling dish filled with orchard apples, hearty root vegetables, and a sprinkle of seasonal herbs—baked until golden and inviting. This casserole isn't your average fare; it’s a conversation starter at every holiday table, blending tradition with a dash of daring. It’s perfect for those cold weekends when you want something simple yet unforgettable.

    **WHY I LOVE THIS RECIPE?**

    • I get to combine my love for fall produce with a unique baking technique—layers matter here.
    • The aroma of cinnamon and roasted veggies makes the house feel like a festive hug.
    • It’s perfect for making ahead, saving me time during hectic holiday prep.
    • Each bite offers a delightful balance of sweetness, earthiness, and crispy topping.

    **AVOID MY DISASTER (You’re Welcome)**

    • FORGOT: Adding too much cheese, turned soggy—quick fix: sprinkle fresh herbs to revive texture.
    • DUMPED: Batter was too thick, resulting in gluey layers—add a splash of broth for fluffiness.
    • OVER-TORCHED: Top burned before center cooked—cover with foil for even warmth.
    • SNOOPED: Forgot to preheat oven, baked unevenly—set timer, avoid the cold start.

    **QUICK FIXES THAT SAVE YOUR DAY**

    • When burning edges, splash water on foil and reduce oven temperature.
    • Patch over a runny center with a thick layer of mashed potatoes.
    • Shield burnt spots with a sheet of aluminum foil; smell of caramelized cheese will soothe.
    • If sauce’s too thick, stir in warm broth until silky.
    • When you need a quick crunch, sprinkle extra breadcrumbs and bake for 5 minutes.

    Autumn Root Vegetable and Apple Casserole

    This casserole combines tender roasted root vegetables and sweet orchard apples layered with seasonal herbs and baked until golden and bubbling. The dish features a crispy topping and a warm, hearty interior with a rich mixture of earthy, sweet flavors and inviting aromas. Its textures range from melt-in-your-mouth vegetables to a crunchy crust, creating a comforting yet surprising fall-inspired meal.
    Prep Time 20 minutes
    Cook Time 45 minutes
    Total Time 1 hour 5 minutes
    Servings: 6
    Course: Main Course
    Cuisine: American
    Calories: 320

    Ingredients
      

    • 3 medium sweet apples peeled, cored, sliced
    • 4 cups mixed root vegetables such as carrots, parsnips, turnips, chopped
    • 2 tablespoons olive oil for roasting
    • 1 teaspoon ground cinnamon for flavor
    • 1 cup breadcrumbs for topping
    • 2 tablespoons butter melted, for topping
    • 1 tablespoon fresh thyme chopped
    • Salt and pepper to taste

    Equipment

    • Large mixing bowl
    • Sharp knife
    • Baking dish
    • Oven
    • Saucepan

    Method
     

    1. Preheat your oven to 375°F (190°C).
    2. Toss the chopped root vegetables with olive oil, ground cinnamon, salt, and pepper in a large bowl until evenly coated.
    3. Spread the coated vegetables in a single layer on a baking sheet and roast in the oven for about 25-30 minutes, or until tender and slightly caramelized.
    4. While the vegetables roast, prepare the apple slices and set aside.
    5. Once the vegetables are done, remove from oven and reduce the temperature to 350°F (175°C).
    6. Layer the roasted vegetables evenly in the baking dish, then scatter the sliced apples over the top.
    7. Mix the breadcrumbs with melted butter and chopped thyme, then sprinkle generously over the layered vegetables and apples.
    8. Place the assembled casserole in the oven and bake for about 20-25 minutes, or until the topping is golden brown and bubbling along the edges.
    9. Remove from oven, let it rest for 5 minutes so flavors meld, then serve warm and enjoy the hearty, aromatic fall flavors.
    This casserole captures the restless spirit of fall—comforting yet filled with the thrill of trying something new. It’s a testament to the season’s bounty, evolving with each ingredient and twist. No matter the chaos, it’s a dish that invites everyone to gather, sharing warmth and flavors.

  • The Unexpected Charm of Mango Slushie: A Sunshine Sip for Any Mood

    The Unexpected Charm of Mango Slushie: A Sunshine Sip for Any Mood

    What makes this mango slushie stand out? It’s the way the simple ingredients come together to create a burst of freshness that’s both elegant and playful. Whether you’re celebrating the tail end of mango season or just craving a sweet reprieve, this drink hits the perfect note. It’s the kind of refreshment that lifts spirits and cools down chaos in a glass.

    Mango Slushie

    This mango slushie is a chilled beverage made by blending ripe mango chunks with ice and sweetener until smooth. The result is a vibrant, icy drink with a silky texture and bright, tropical flavor, perfect for hot days or as a refreshing treat.
    Prep Time 10 minutes
    Total Time 10 minutes
    Servings: 2
    Course: Main Course
    Cuisine: Tropical
    Calories: 120

    Ingredients
      

    • 2 cups ripe mango chunks peeled and pitted
    • 1 cup ice cubes adjust for desired thickness
    • 2 tbsp honey or simple syrup optional, for added sweetness
    • 1 tbsp lemon juice to enhance flavor

    Equipment

    • Blender
    • Measuring cups and spoons

    Method
     

    1. Add the mango chunks, ice cubes, honey, and lemon juice into the blender.
    2. Blend on high speed until the mixture is smooth and icy, about 30-45 seconds, making sure to break down all the mango pieces.
    3. Stop the blender and check the consistency—if it’s too thick, add a splash of water or juice and blend again until it reaches your desired texture.
    4. Pour the slushie into glasses, revealing its vibrant orange color and icy texture.
    5. If desired, garnish with a small slice of mango or a sprig of mint for a pop of color.
    6. Serve immediately with a straw, enjoying the refreshing, icy burst of tropical flavor.
    In a world full of complicated recipes, this mango slushie reminds us that sometimes, less truly is more. Its cheerful color and sweet aroma bring a bit of the tropics into your everyday routine, no matter the weather outside.
    Enjoying a sip of this chilled delight transforms ordinary moments into mini escapes. It’s a simple joy, crafted in minutes, that belongs in your rotation as a go-to treat during hot days or cozy nights alike.

  • Frozen Fun: The Surprising Charm of Kool Aid Slushies

    Frozen Fun: The Surprising Charm of Kool Aid Slushies

    On a scorching summer day, I stumbled upon a forgotten packet of Kool Aid that I decided to freeze into a slushie. The result was unexpectedly vibrant and refreshingly nostalgic, tasting like childhood in every sip. This simple twist transforms an everyday drink mix into a frosty treat that sparks spontaneous smiles.

    Many overlook the potential of Kool Aid beyond the pitcher; it’s a secret toolkit for icy adventures that can brighten any hot afternoon. With just a few ingredients and a little patience, you can craft a dessert that’s both inexpensive and bursting with flavor. It’s a cool way to relive your favorite summer memories with a modern chill.

    Kool Aid Frozen Slushie

    This frozen slushie is made by dissolving Kool Aid powder into water and freezing the mixture until it reaches a crunchy, ice-like texture. The result is a vibrant, refreshing treat with a smooth, icy consistency, perfect for hot summer days. Its bright color and nostalgic flavor make it a fun and simple dessert option.
    Prep Time 10 minutes
    Cook Time 2 hours
    Total Time 2 hours 10 minutes
    Servings: 2
    Course: Main Course
    Cuisine: American
    Calories: 50

    Ingredients
      

    • 1 packet Kool Aid powder (flavor of choice) typically 0.13 oz packet
    • 1 cup cold water to dissolve the Kool Aid

    Equipment

    • Mixing bowl
    • Freezer-safe container
    • Spoon or spatula

    Method
     

    1. Pour the Kool Aid powder into a mixing bowl and add the cold water. Whisk vigorously until the powder is fully dissolved and the mixture turns bright and uniform, with no granules visible.
    2. Pour the liquid Kool Aid mixture into a freezer-safe container, spreading it out evenly to ensure quick and uniform freezing.
    3. Place the container in the freezer and freeze for about 2 hours, or until the edges start to firm up and the mixture becomes icy but not completely frozen.
    4. Remove the container from the freezer and scrape the partially frozen mixture with a fork, breaking up any large ice chunks and mixing to create a slushy texture.
    5. Return the container to the freezer and freeze for another 1-2 hours, repeating the scraping process every 30 minutes to develop a fluffy, crystalline icy texture.
    6. Once the mixture is evenly frozen and has a soft, scoopable texture, give it a final stir to ensure consistency.
    7. Scoop the vibrant Kool Aid slushie into glasses, garnishing with a slice of fruit or a fun straw if desired. Serve immediately for a refreshing, icy treat.

    Notes

    For best results, scrape and mix the mixture every 30 minutes during freezing to achieve a smooth, slushy consistency.

    This Kool Aid slushie isn’t just a quick fix for a heatwave—it’s a reminder of the joy found in simple pleasures. As the ice crystals melt on your tongue, you’ll remember why these small moments make the season special. It’s a fun, fuss-free way to cool down and indulge, no fancy equipment needed.

    Whether sharing with friends or enjoying solo, this icy concoction fits every summer occasion. It’s easy, colorful, and surprisingly versatile, inviting endless flavor experiments. Cheers to keeping cool with a splash of childhood magic in every icy sip.